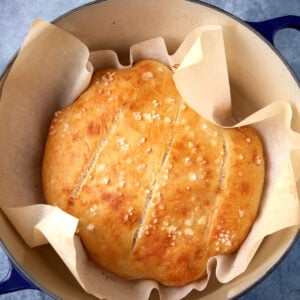
No-Knead Dutch Oven Bread with a Crisp Crust and Soft Center
This beginner-friendly Dutch oven bread uses simple pantry ingredients and a no-knead method that does most of the work for you. The dough rises slowly in the refrigerator, which improves flavor and makes it easier to handle. Baking it in a preheated Dutch oven creates a crackly crust and a tender interior that feels bakery-worthy at home.
Equipment
Ingredients
- 6 cups flour
- 3 cups warm water
- 2 packages instant dry yeast
- 1 tablespoon salt
- ⅛ cup milk
- Coarse salt
Instructions
- Add the flour, yeast and salt to the bowl of a stand mixer or a large mixing bowl. Add the warm water and stir with a spoon until combined. If using a stand mixer, use the paddle attachment and mix for about 1 minute until combined. It will be very sticky.
- Place in a very large bowl, and cover with plastic wrap. Let it sit at room temperature for about 2 hours, then refrigerate for at least 2 hours, but preferably overnight and up to 7 days.
- Remove the bread from the refrigerator. Flour your hands and sprinkle the top of the dough with a little flour. Remove half of the dough and place it on a floured surface. Refrigerate the rest of the dough for another loaf. Use your hands to shape it into a round ball. Place on a piece of parchment paper and sprinkle with a light dusting of flour. Let it rise for about 1 hour. It won’t get taller, but will expand some. Cover and refrigerate the remaining dough.
- While the bread is rising, add the Dutch oven to the lowest rack in the oven and preheat to 450º. Add a small cast iron or metal pan to the oven.
- When the dough is ready, slash the top with a sharp knife, 2-3 times about ½ inch deep. Brush the bread with milk and sprinkle with coarse salt.
- Transfer the bread, on the parchment paper, to the hot Dutch oven. Cover and place in the oven. Do not take the bread off the parchment paper. Pour a cup of water into the iron skillet or metal pan and close the door before the steam comes out.
- Bake for 20 minutes covered, then remove the lid and bake an additional 15 minutes until the crust is a deep golden brown. Use the edges of the parchment paper to remove the bread and place on a rack to cool.
Barbara's Notes + Tips
- This recipe makes 2 loaves of bread.
- Make-ahead: Keep the dough refrigerated for up to a week and bake when needed.
- For cleaner slices: Use a serrated knife and a gentle sawing motion once the loaf is completely cool. Warm bread will compress and tear.
- The size of the Dutch oven will determine the shape of your dough. The dough will spread out more in a large Dutch oven.
Nutrition
Calories: 138kcal | Carbohydrates: 29g | Protein: 4g | Fat: 0.4g | Saturated Fat: 0.1g | Polyunsaturated Fat: 0.2g | Monounsaturated Fat: 0.05g | Cholesterol: 0.2mg | Sodium: 352mg | Potassium: 43mg | Fiber: 1g | Sugar: 0.2g | Vitamin A: 2IU | Vitamin C: 0.001mg | Calcium: 9mg | Iron: 2mg
