

Angel biscuits are a type of light and fluffy biscuit that use both yeast and baking powder to achieve a delicate texture. What’s wonderful about these soft and fluffy biscuits is that it’s just about impossible to make them incorrectly. It’s true! Angel biscuits are a fool-proof recipe that anyone can make. They’re almost as easy as classic buttermilk biscuits but even more likely to come out of the oven perfectly, every single time.

This recipe for Angel Biscuits is fool proof!
A deliciously perfect cross between a homestyle biscuit and a yeast roll, angel biscuits are tall, buttery biscuits that are made using active dry yeast. Most homemade biscuits use only baking soda and baking powder to provide the height and rise the dough gets, but this recipe also uses yeast, a fail-safe option that gets results every time.
These Southern biscuits come from an old, traditional recipe that’s worth keeping in your recipe box. In the past, they were called “Bride’s Biscuits”,because even a brand-new bride (or groom) could master the recipe! So certainly, you can too.
The texture is a little lighter than a traditional biscuit and they are always tall and fluffy. This makes them perfect for butter, jam or honey but also as a base for sausage gravy. You’ll love them with Southern chicken fried chicken.
Warm Up Your Winter: Southern Classics!
FREE EMAIL BONUS: Southern staples made simply & cozy
How are they different
Southern Biscuit dough is mixed then cut and set (or dropped) onto a baking sheet, and in the oven they go.
But angel biscuits have an extra step and a few extra ingredients. First, angel biscuits use the same ingredients, but incorporate active dry yeast, as well. Because of this, the recipe requires some sugar to help activate the yeast. They also use buttermilk and butter for extra tang and fluffiness.
Finally, one significant difference is that angel biscuit dough needs some time to rise. Unlike yeast rolls, they only need one rise and this is after they are cut and placed in the pan. So hands on time is the same, you just need to allow for a one hour rise time that you don’t have with biscuits.

Why everyone loves this Angel Biscuits Recipe
- It’s a fail-safe recipe that works every time.
- Angel biscuits are really versatile since they’re a cross between a flaky dinner roll and a biscuit. You can use them for many different things.
- They taste fantastic! They’re a little bit tangy with a touch of sweetness and a pleasant amount of buttery yumminess.
Before You Get Started
- Try to avoid touching biscuit dough with your hands, use a food processor, pastry cutter or two forks to make the dough and use a rolling pin to roll it out rather than patting it with your hands. The heat from your hands will melt the butter.
- Allow your biscuits to rise in a warm area of your kitchen. Try using the microwave, just boil some water and immediately put the dough into the warm steaming microwave to rise.
What you’ll need for Yeast Biscuits

I full list of the ingredients can be found in the Recipe Card below.
- Active dry yeast – Always try to use fresh yeast, you can use instant yeast if you prefer. As yeast is a living organism, old packets won’t work as well and might not even work at all!
- Bread flour – Bread flour will give your recipe the best texture and rise, but if you don’t have it, you can substitute all-purpose.
- Sugar – The sugar activates the yeast. You won’t use enough to make the biscuits sweet.
- Buttermilk – This adds a pleasantly tangy flavor to your biscuits, and it helps to activate the baking powder and soda. You can make your own, learn how to make your own buttermilk from ingredients in your pantry.
Any recipe that requires yeast will need a bit of sugar. This acts like a food source for the dry yeast, essentially ‘waking it up.’ Then, after the yeast is active and it’s added to your dough, it needs time for those carbon dioxide gasses to grow. These work best in warm temperatures, so sitting your dough in a warm area or near a sunny window will help your dough grow nice and big.
How to make Angel Biscuits
Step 1: Activate the yeast.


Step 2: Make the dough.
Use a food processor or a pastry blender to combine the dry ingredients. Pour the buttermilk yeast mixture into the dry ingredients and process until it barely comes together.

Step 2: Knead and roll.


Step 3: Cut the biscuit.
Use a 2-inch biscuit cutter to cut straight down.
Step 4: Prepare your pan.
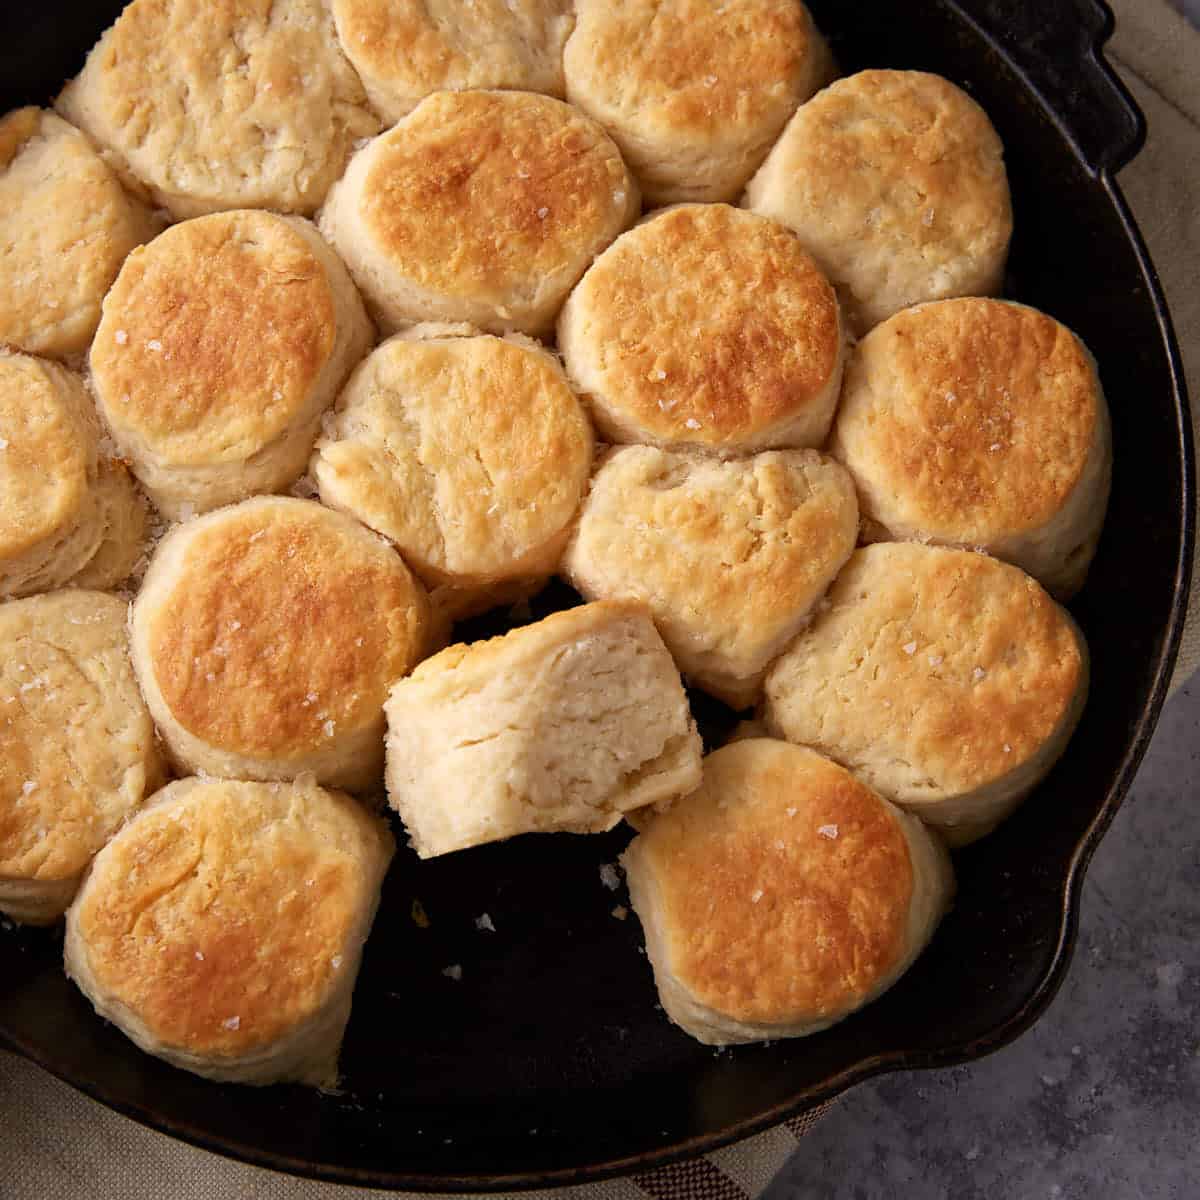
Brush some melted butter on the bottom and sides of a 10-inch cast iron skillet or rimmed baking sheet. Place the biscuits right next to each other in the pan, touching each other. Cover with plastic wrap and place in a warm place to rise for 1 hour. You can also make these on a baking sheet, they will take a minute or two longer to cook.

Step 5: Bake.
Brush melted butter over the top of the biscuits and bake for 12-16 minutes until golden brown. Remove and brush the baked biscuits with more melted butter, then sprinkle with flaky salt.

Yeast Biscuit Recipe storage
You can refrigerate or freeze after you have formed into biscuits.
You can store angel biscuits in an airtight container or Ziploc bag at room temperature to keep them fresh for a day or two.
If you need to store them for a longer period of time, they can be frozen for up to 3 months. Make sure you let them cool to room temperature, then place them in a freezer-safe bag or container.
You can freeze the dough once you have cut them into biscuits but before they have risen. Let them rise once removed from the freezer before baking.
If you loved this recipe, give it a star ⭐️⭐️⭐️⭐️⭐️ rating! Also, snap a picture of your finished dish and share it with me on Instagram using the hashtag #butterandbaggage and tagging me @butterandbaggage.
Lighter Than Air Angel Biscuits with Yeast
Equipment
Ingredients
- 4.5 teaspoons active dry yeast 2 packages
- 3 tablespoons warm water
- 5 cups bread flour/all-purpose flour
- 3 tablespoons sugar
- 1 ½ teaspoons salt
- 2 teaspoons baking powder
- 1 teaspoon baking soda
- 1 cup butter cold
- 2 cups buttermilk cold
- 2 tablespoons butter melted
- Flaky salt sprinkle
Instructions
- Add yeast to a medium sized bowl with warm water and stir to allow it to dissolve. Let it sit for 5 minutes. It will be thick but not foamy.
- Add cold buttermilk to the yeast mixture and whisk until combined.
- In a food processor or large bowl combine flour, sugar, salt, baking powder and baking soda. Process or whisk until combined.
- Add very cold chunks of butter and process until it is incorporated, with pea sized chunks, or use a pastry cutter.
- Pour the buttermilk yeast mixture into the dry ingredients and process until it barely comes together, or use a spatula to combine.
- Turn out onto a floured surface and use your hands to form into a shaggy dough. Once the flour is incorporated, shape into a rectangle and cut into thirds. Stack them on top of each other and roll out into a rectangle. Repeat this three times. Roll into about a 1 inch thickness.
- Use a 2 inch biscuit cutter and cut out the biscuits, going straight down, do not twist.
- Brush some melted butter on the bottom and sides of a 10 inch iron skillet or a 9 x 13 baking pan. Place the biscuits right next to each other in the pan. They should be touching.
- Cover with plastic wrap and place in a warm place to rise for 1 hour.
- 15 minutes before they have finished rising, preheat the oven to 400º.
- Brush melted butter over the risen biscuits and bake for 12-16 minutes until golden brown. Remove and immediately brush with melted butter and sprinkle with flaky salt.
- Makes 18-20 biscuits
Barbara’s Tips + Notes
- You can use either bread or all-purpose flour.
- Try to avoid touching the dough as little as possible as your warm hands will melt the butter.
- Always cut straight down with a biscuit cutter, don’t twist.
- If you don’t have buttermilk, learn how to make your own buttermilk with items in your pantry.
- You can refrigerate the dough once it has been cut into biscuits. Let warm to room temperature before baking.
Nutrition
 Follow Me On SocialDid you make this recipe? Mention @ButterandBaggage or tag #ButterandBaggage
on Instagram!
Follow Me On SocialDid you make this recipe? Mention @ButterandBaggage or tag #ButterandBaggage
on Instagram!
Leave a Reply